Simple DIY Cabinet Repairs
POSTED ON Friday, August 30, 2019 IN Kitchen
Don't let a simple scratch or ding ruin your cabinet's appearance
All it takes is one scratch and, before you know it, that is the first thing that catches your eye every time you glance at your wood cabinet from that point forward. But one scratch does not mean your cabinet is ruined. Your cabinet is not the first in history to have been besmirched by an unsightly scratch, and fortunately solutions have been developed to remove scratches and restore your cabinet to its original unblemished appearance.
The same can be said for any other issues you are having with your cabinet, from drawers won’t open or close to drawers that are unlevel. These are all problems with solutions.
Repairing Scratches and Dings
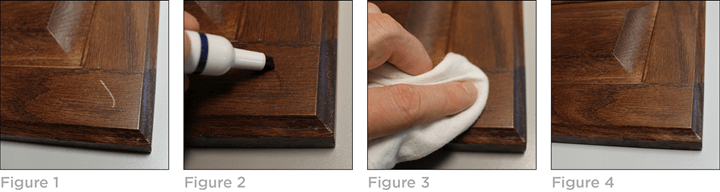
What if your door, drawer front, or crown top is scratched? In most cases, minor dings or scratches can be touched up with a Bertch touch-up kit. The Bertch kit will match your cabinet’s finish exactly. One alternative is to purchase Guardsman® touch-up markers and filler sticks readily available at almost any home improvement store.
When you are repairing a scratch, always begin by using the LIGHT marker from your touch-up kit. Lightly brushing In the direction of the grain, apply the felt tip over the area to be retouched. Immediately wipe with a soft, dry cloth to remove excess product. Repeat as necessary, wiping off excess each time. If the initial result is too light, switch to the MEDIUM marker, then the DARK marker, if necessary. Allow the dye to set for five minutes before polishing.
For deeper scratches and blemishes, filler sticks can be used for touch-up. Just select the stick that best matches your wood finish. Work the tip of the stick into the damaged area until filled, being careful not to fill up grain or pores around the repair area. Remove excess fill material with a flexible, plastic straightedge or by gently buffing away with a cloth, paper towel, or napkin.
Common Drawer Adjustments
When functioning properly, cabinet drawers should glide smoothly and effortlessly in and out. But if a drawer has begun to noticeably rub, stick, or bind when opening or closing, don’t think that this is something you’ll simply have to live with. Simple adjustments can be made to get your cabinet drawers back on track -- figuratively or literally.
Leveling the drawer front
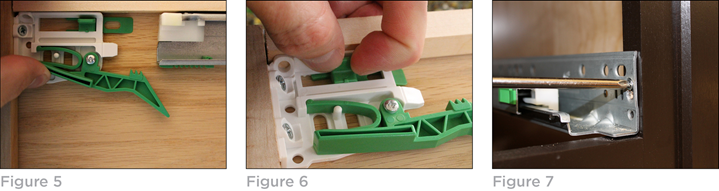
First, remove the drawers by fully extending the drawer and squeezing the tabs on the front locking device to release, removing the drawer easily. (Fig. 5) The plastic levers that slide forward and back adjust the levelness of the drawer front. Slide the lever forward — toward the drawer front — to lower that side, and slide the lever back to raise that side. (Fig. 6). If the drawer is still not level, locate the screw attaching the drawer glide to the cabinet frame on the side of the drawer that needs to be raised to achieve level. Using a Phillips head screwdriver, loosen the screw, raise the drawer glide to the desired height, and re-tighten the screw. (Fig. 7).
How to fix drawers that don’t close completely
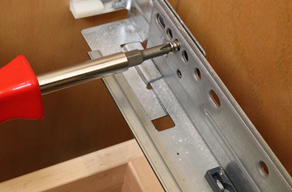
This is normally an easy problem to fix.The most common culprit is that the screw towards the back of the glide has worked itself loose somehow. It could be sticking out far enough for the drawer to catch on when trying to close. Simply tighten this screw with a Phillips screwdriver.
If the drawer still won’t close completely, it’s possible the drawer box simply needs to be reseated. Many times, just by removing and then replacing the drawer box, the components used for closing the drawer are able to re-engage and function properly.
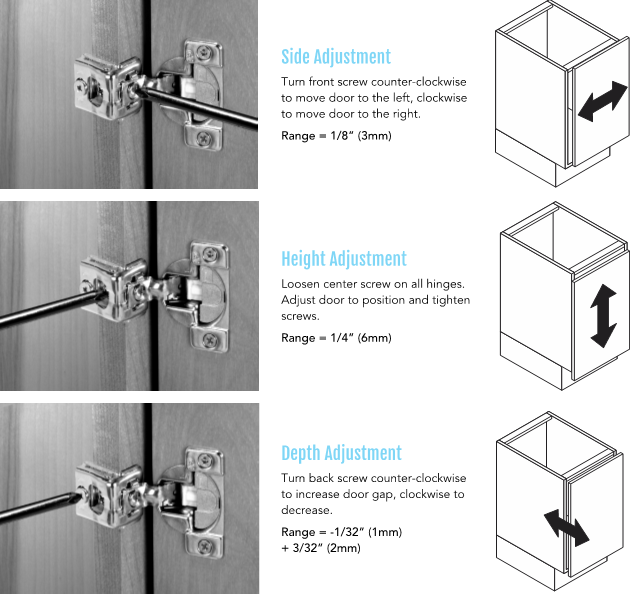
Common Door Adjustments
If your vanity doors are spaced too far apart, or are unlevel, it is not uncommon for doors to shift slightly during the shipping or installation process. “Butt doors” — side by side doors that meet in the middle — may have a gap, or single doors may seem tilted, or appear to be positioned incorrectly. The front, center, and back screws can be used to make side, height, and depth adjustments, respectively, depending on the issue you are having with your doors.
If you would like to talk to one of our experts in person before trying your hand at DIY repairs, visit our nearest showroom and we would be happy to talk you through it.
RECOMMENDED